ESP32 Momentary Push Button with Arduino IDE
## **Introduction** The Momentary Tactile Push Button Module is a simple and essential input device used to trigger actions when pressed. This version includes a built-in pull-down resistor, allowing easy and direct connection to the ESP32. In this tutorial, you’ll learn how to connect the push butt
#Introduction
The Momentary Tactile Push Button Module is a simple and essential input device used to trigger actions when pressed.
This version includes a built-in pull-down resistor, allowing easy and direct connection to the ESP32.
In this tutorial, you’ll learn how to connect the push button to an ESP32 and read its state using digital input.
#Required Components
- ESP32 Board
- Momentary Tactile Push Button Module (with built-in resistor)
- Jumper wires
- Breadboard (optional, for easier connections)
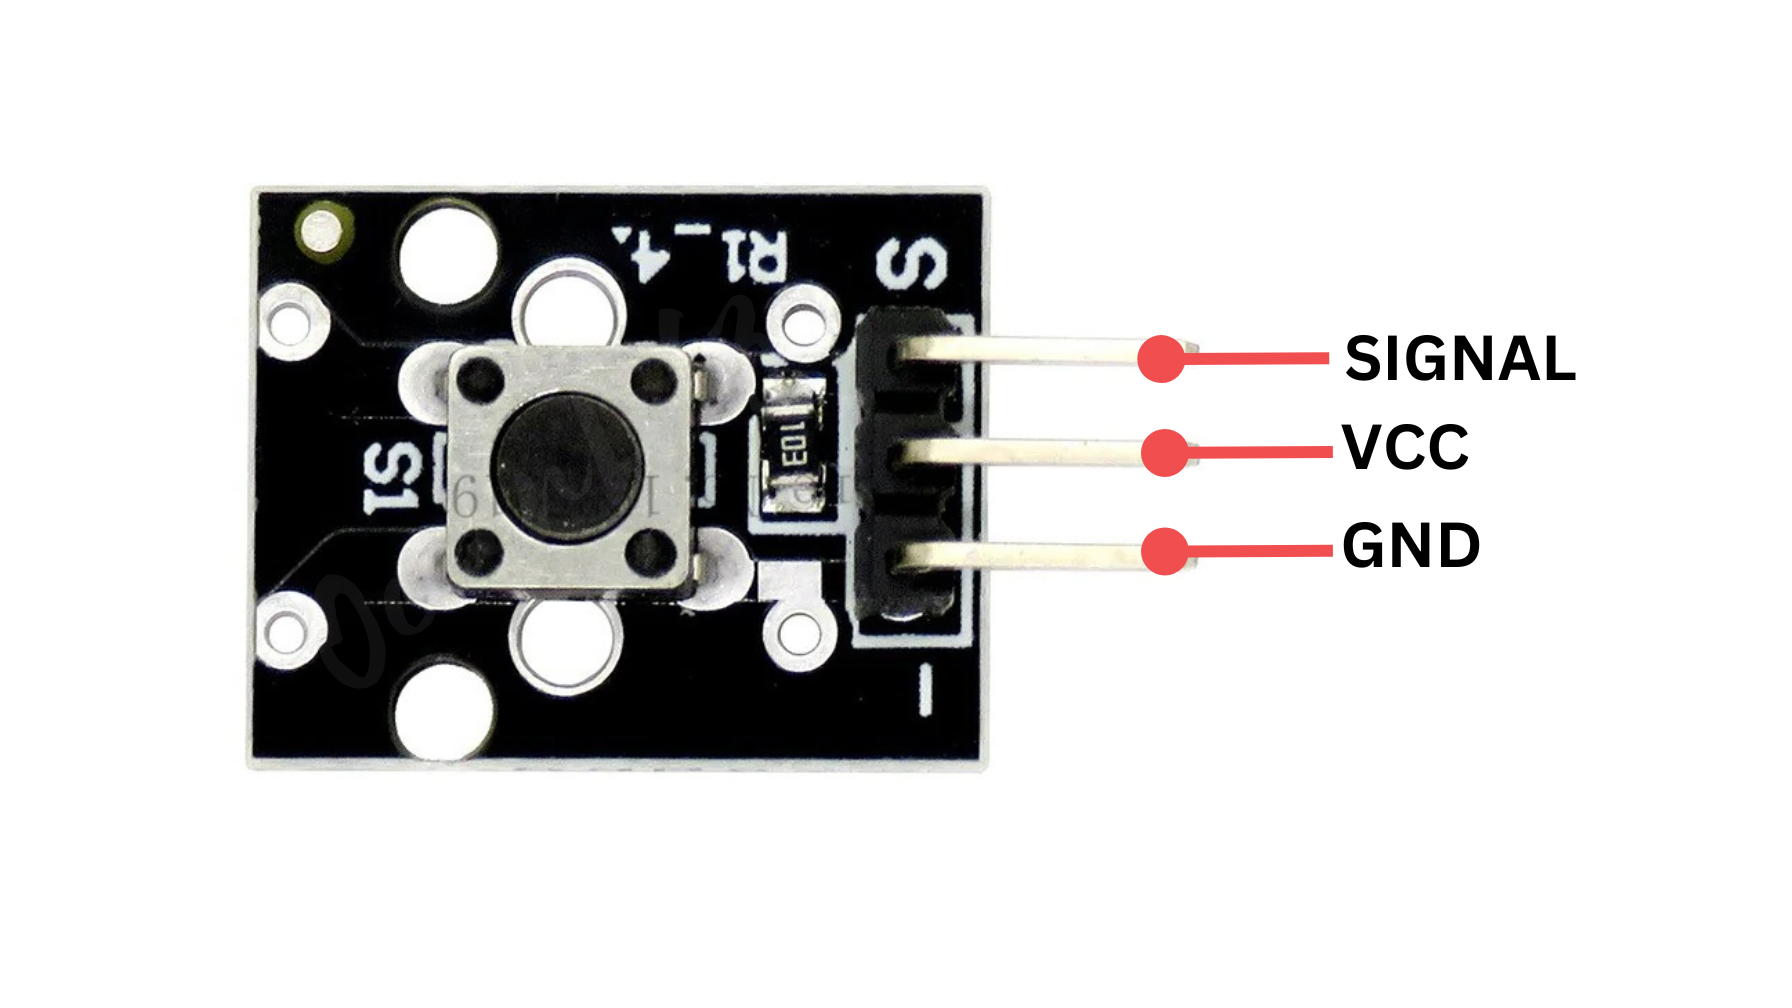
#Pinout
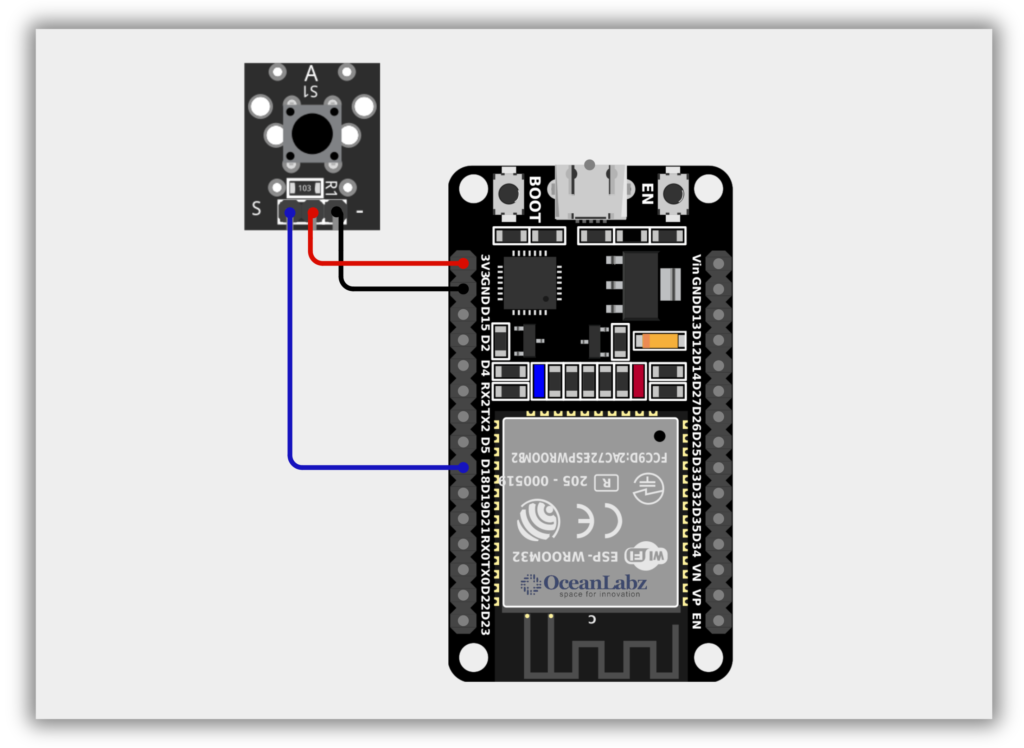
#Circuit Diagram / Wiring
- Push Button VCC → VIN/5V, 3.3V (ESP32)
- Push Button GND → GND (ESP32)
- Push Button SIGNAL → Pin 18 (ESP32)
#Code / Programming
/* Filename: Basic_Button_Press.ino Description: Reads a push button with stable debounce on ESP32 Author: www.oceanlabz.in Modification: 1/4/2025 */
// Use a safe GPIO pin on ESP32 (avoid 0, 1, 3, etc.) // Example: GPIO 18 #define BUTTON_MODULE_PIN 18 // Momentary Tactile Push Button Module
void setup() { pinMode(BUTTON_MODULE_PIN, INPUT_PULLUP); // Use internal pull-up resistor Serial.begin(115200); // Start Serial Monitor at 115200 baud }
void loop() { // Read the state of the push button int moduleState = digitalRead(BUTTON_MODULE_PIN);
// Check if the button is pressed if (moduleState == LOW) { Serial.println("Module Button Pressed!"); }
delay(100); // Small delay for debounce }
#Explanation
- The tactile push button sends a LOW signal when pressed using the
INPUT_PULLUPconfiguration on ESP32. - It requires only one GPIO pin and no external resistor due to the ESP32’s internal pull-up capability.
- Used to trigger actions or inputs in interactive projects like toggling LEDs, counting, or navigating menus.
#Troubleshooting
- If the button doesn’t respond, verify correct wiring (one side to GND, other to GPIO pin).
- Avoid GPIOs 0, 1, 2, 3, 6–11 on ESP32 as they may interfere with boot or serial functions.
- If it always reads HIGH, ensure the button is firmly pressed and properly connected to GND.
#Project 1: Switch Debounce
#Introduction
This project demonstrates how to implement stable push-button input with software debounce using an ESP32.
Mechanical push buttons often produce noisy, bouncing signals that can cause multiple false triggers.
To solve this, the code waits for the button state to remain unchanged for a short delay, ensuring stability.
This method guarantees that only intentional presses and releases are registered by the ESP32.
It’s a critical technique for building reliable user interfaces, state toggles, and input counters.
Ideal for any ESP32 project where accurate and noise-free button detection is essential.
/* Filename: switch_debounce.ino Description: Reads a push button with stable debounce on ESP32 Author: www.oceanlabz.in Modification: 1/4/2025 */
#define BUTTON_PIN 18 // GPIO where button is connected #define DEBOUNCE_DELAY 50 // Minimum time (ms) the state must be stable
bool last_button_state = HIGH; // last debounced state bool current_button_state = HIGH; // raw read state unsigned long last_debounce_time = 0;
void setup() { Serial.begin(115200); pinMode(BUTTON_PIN, INPUT_PULLUP); // use internal pull-up resistor Serial.println("Switch debounce started..."); }
void loop() { bool reading = digitalRead(BUTTON_PIN);
if (reading != current_button_state) { // Button state has changed, reset debounce timer last_debounce_time = millis(); current_button_state = reading; }
if ((millis() - last_debounce_time) > DEBOUNCE_DELAY) { // State has been stable for longer than debounce delay if (reading != last_button_state) { last_button_state = reading;
[object Promise]}
delay(5); // optional small delay }
#Explanation
- Mechanical push buttons generate noisy signals; debouncing helps avoid false multiple detections.
- The code uses a time delay to confirm if the button state has remained stable before acting.
- It ensures accurate detection of button presses/releases on the ESP32 using
INPUT_PULLUP.
#Troubleshooting
- If the button doesn’t respond, check the wiring and pin number (GPIO18 in code).
- Ensure the button is connected between GPIO and GND when using
INPUT_PULLUP. - Increase
DEBOUNCE_DELAYslightly if you still see false triggers or flickering in Serial output.